


Most Windows 11 optimization guides will tell you to disable a few startup apps, uninstall apps, or change power modes. But a lot is going on behind the scenes that needs some manual fixes and optimizations. Windows 11 is pretty bloated, which hampers performance a lot, especially on low-end computers.
Compared to Windows 10, the baseline installation of Windows 11 tends to consume more RAM at idle, run more background services, and have a larger disk footprint. There are obvious improvements in looks and functionality, but the overall hardware load keeps increasing with new versions of Windows.
Modern operating systems aren’t just the software layer on top of the hardware to make it usable for you. They are actually full ecosystems. Windows 11 comes with bundled apps, telemetry pipelines, background update mechanisms, advertisement surfaces, and various other suggested experiences. Collectively, they create dozens of background processes, most of which are of no use to you or the system itself. But these processes quietly compete for CPU time, memory, and disk access.
Windows, in itself, was never a slow operating system. In fact, below the layers of consumer features, there is a remarkable kernel that powers gaming rigs, professional workstations, and enterprise servers. When unnecessary components are trimmed, background activity is controlled, and system policies are tuned properly, Windows 11 can feel dramatically lighter. This is what we are going to help you with in this article. So, let’s get started.
Why does Windows 11 slow down?
Operating systems are the coolest things that allow you to utilize and have control over the hardware without even knowing what is happening under the hood. The Windows 11 codebase contains an estimated 50 to 60 million lines of code. All this requires great handling of physical resources, and the minds behind Windows 11 are the best for this task. But not everyone’s needs are the same, and we always have room to eliminate things that are not important to us and allow more space for the things that are more important to us.
Windows 11 is visually the most appealing ever. The movements are smooth, and fonts and menus are much more modern. All these things look amazing, but they take a toll on the resources because, at the end of the day, it is the code that has to run using the hardware resources.
Anything that happens on your computer requires hardware resources like memory, storage, and CPU power. So, the higher the load on these resources, the worse the performance will be.
In most cases, the RAM is mostly impacted due to these additional processes going on. Windows 11 also comes with significant bloat without your permission. Although modern CPUs and RAM are getting faster and faster, the need for visual enhancement is increasing.
In simple terms, the increased number of visual elements and additional components make Windows 11 slower than older versions. This is the same in any operating system, whether mobile or desktop.
Before you optimize
My computer is never slow because I know my specifications and its limitations. So, before you perform any optimization, make sure that you are keeping your expectations right.
For example, no amount of Windows tuning gets smooth 4K timeline scrubbing without a dedicated GPU and enough VRAM. In simple words, if your hardware isn’t enough for a task, you can’t do anything with the software tweaks.
Another thing that you should do before performing any optimization is to back up your data. It becomes much more important if you are going to use some software for these optimizations.
Step 1: Startup Optimization
Every time your system boots up, it doesn’t load just the operating system. It also launches dozens of applications and services that have the permissions to start automatically.
Some startup apps are important, while some open up without any serious requirements. Programs such as antivirus, audio drivers, graphics driver software, and touchpad utilities are important to load during the startup, while some other exist purely for convenience. Programs such as cloud storage clients, game launchers, update checkers, vendor software, and printer utilities, etc can be considered unnecessary.
Optimizing your PC for a good startup means stopping these startup programs from loading in the first place. Thankfully, Windows 11 allows us to do so. We can either disable the unwanted startup applications or simply remove them from our computer if they are not required at all. Most people uninstall or disable apps such as Spotify, Steam, OneDrive (if they don’t use file sync), LinkedIn, and other vendor-specific software. It is good to leave enabled important programs such as Windows Security, Microsoft Defender, Graphics software, Touchpad software, Audio drivers, etc.
Let’s see how you can disable unwanted startup applications.
- Press Ctrl + Shift + Esc to open Task Manager
- Click Startup apps in the left sidebar
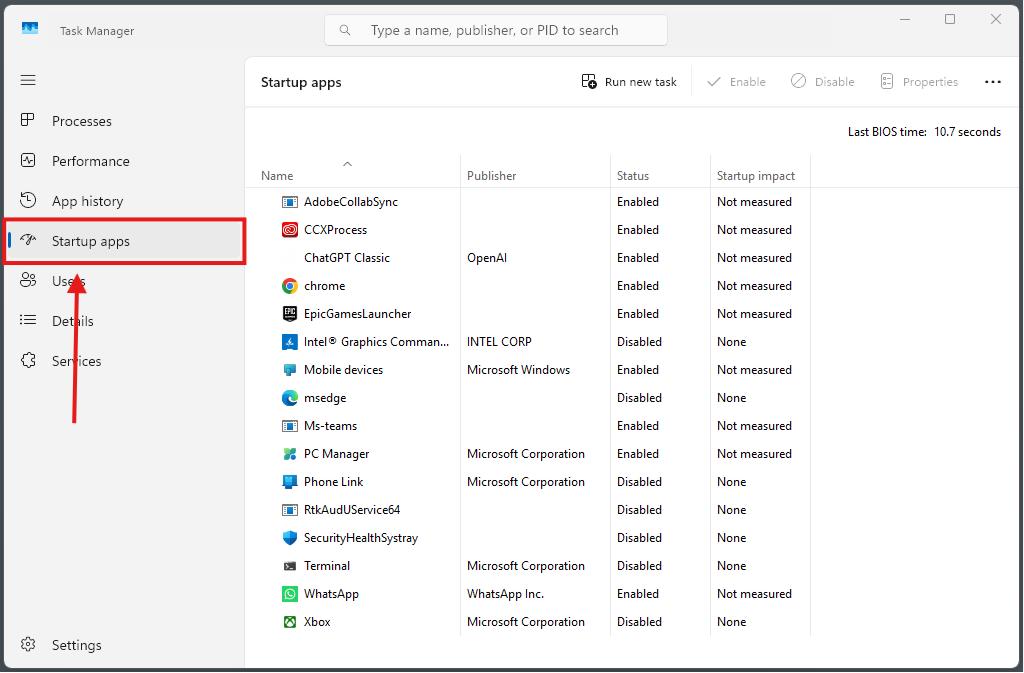
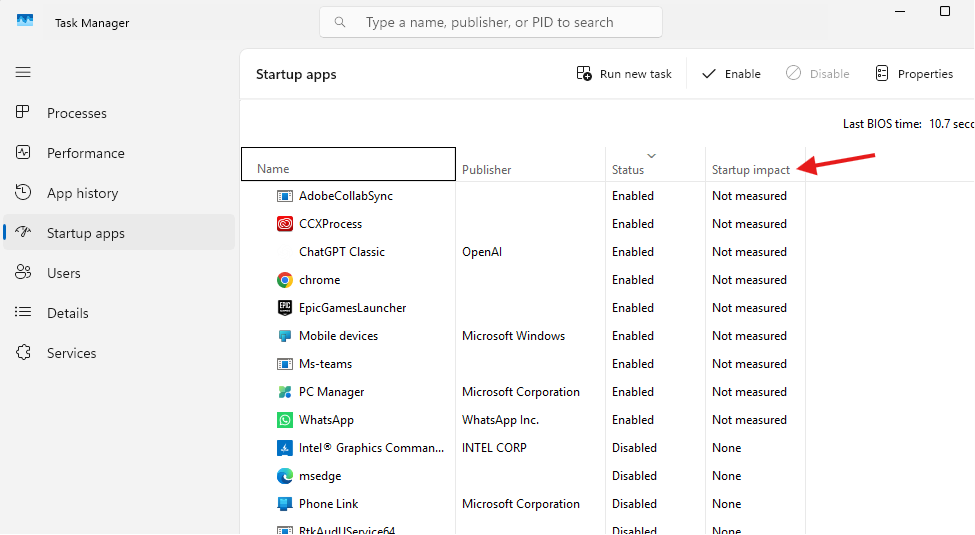
- Sort by startup impact to check which program is impacting the startup time the most. You can also check the current startup status (enabled or disabled).
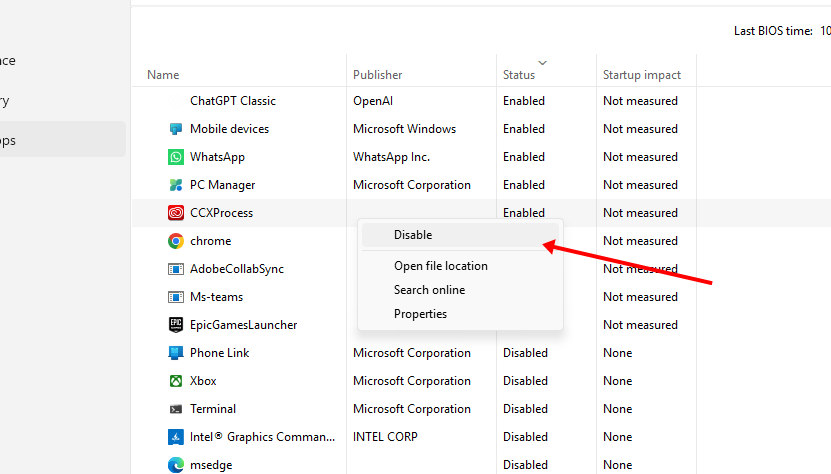
- Right-click the program and click Disable to prevent the program from loading during the startup process.
If there are a lot of unnecessary startup apps loading during startup, you should see a significant improvement in the startup time after disabling them. Also, check if there is any app in the startup menu that you hardly or never use. Uninstalling them will be a much better option here.
Step 2: CPU Optimization
There is hardly anything you can do directly to the CPU to enhance its performance. Except for overclocking it, which I would recommend if you are new to it, you can only do some CPU optimization on the operating system. If you check Microsoft’s own guide on PC performance, you would hardly find any serious tweaks.
But we can still do some tweaks and technically call them CPU optimizations. Let’s discuss them all one by one.
2.1 Change your Windows power plan
Windows offers the option to actively change the power plan to allow more or less power for performance optimization. This feature is great for laptop users to enhance battery life. However, on PCs as well, we can utilize this feature to allow the system to remove any power restrictions and give us a little better performance.
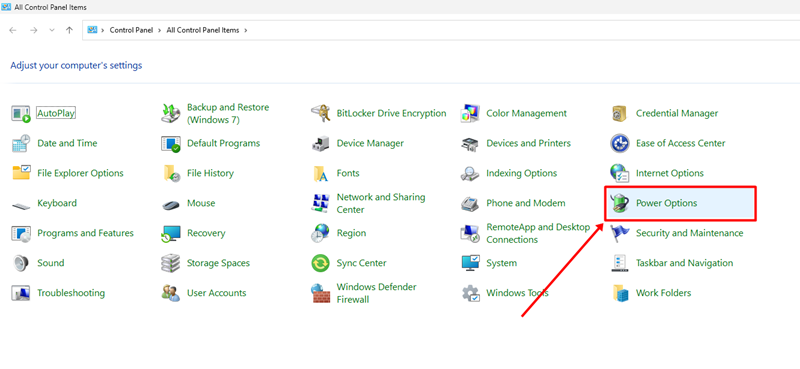
- Open Control Panel and go to Power Options.
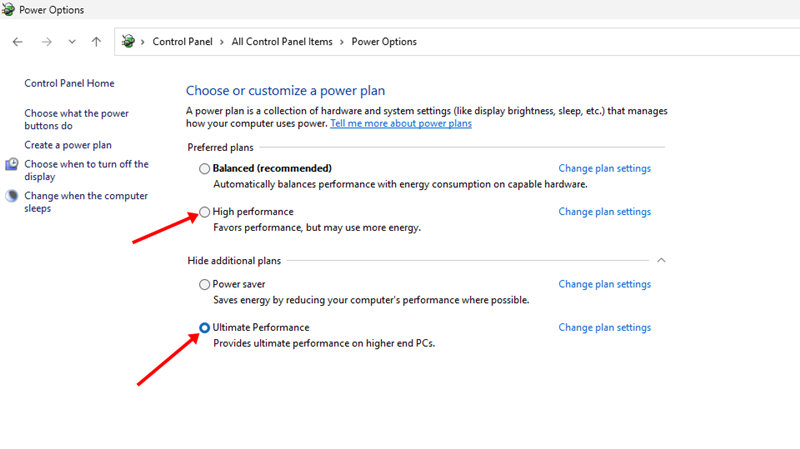
- Select either High Performance or Ultimate Performance if you have the Windows Pro version.
- Restart your PC
2.2 Improve Cooling
Bad cooling can cause your CPU to thermal throttle, which is the process of reducing performance to compensate for high heat. This happens in high-end PCs where you demand near-maximum output from your CPU but don’t offer good cooling for it. This includes cleaning the case and CPU fans. If you are using an AIO, make sure to clean the radiator fins and the fans regularly. Monitor the CPU temperature for thermal throttling; if it occurs even with everything in place, you may need to upgrade the cooling setup.
2.3 Reduce Background CPU usage
Every background process competes with your active applications for CPU time. Windows has a great scheduler to reduce processor cycles to unnecessary tasks, but some software can wake up to check for updates, telemetry, and other things. However, stopping these things manually is difficult and requires technical expertise. Still, you can do these things to make sure your CPU resources aren’t wasted.
- Disable unnecessary startup applications (as discussed above)
- Close applications you aren’t using.
- Disable unnecessary third-party background services (covered later in the guide).
- Remove software you no longer use.
- Keep browser background processes disabled.
Step 3: Storage Optimization
In modern computers, storage drives are not just for raw data storage but much more. With methods like paging, virtual memory, and DMA, modern SSDs (especially the NVMe drives) help systems achieve their highest potential. So, a slow storage drive makes your computer slow by creating a bottleneck for the data that is important for the task at hand.
As the storage drives start to fill over 50% or more, the read/write performance starts to decline. Other factors may include age and wear on the NAND cells. But, there are some general practices to make sure your drives stay in good health and have a good performance. Let”s talk about them one by one.
3.1 Remove Temporary Files
Windows creates a lot of temporary files for updates, browser caches, error logs, application installations, and system maintenance. IWith all this data, the storage drives can start to fill up pretty fast and in some cases occupy a lot more space than required. Over time, the total tempoary files can easily occupy gigabytes of storage space. Here is how you can easily clear out the temporary files in any Windows computer.
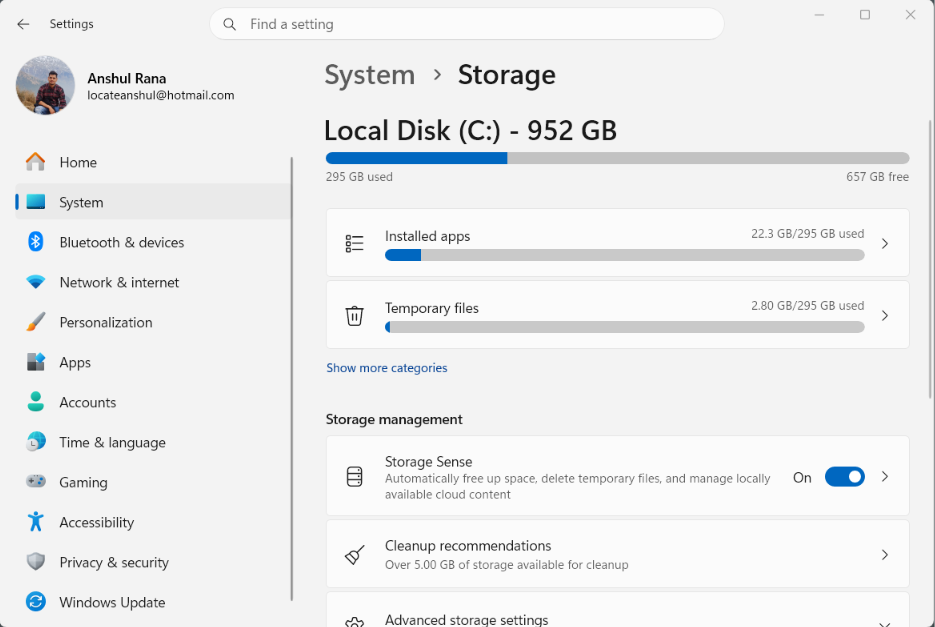
- Open Settings.
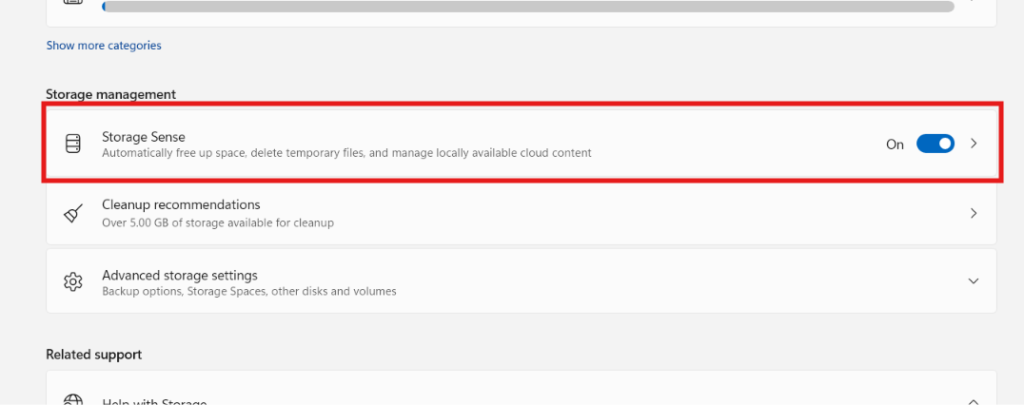
- Navigate to System → Storage. Click Temporary Files.
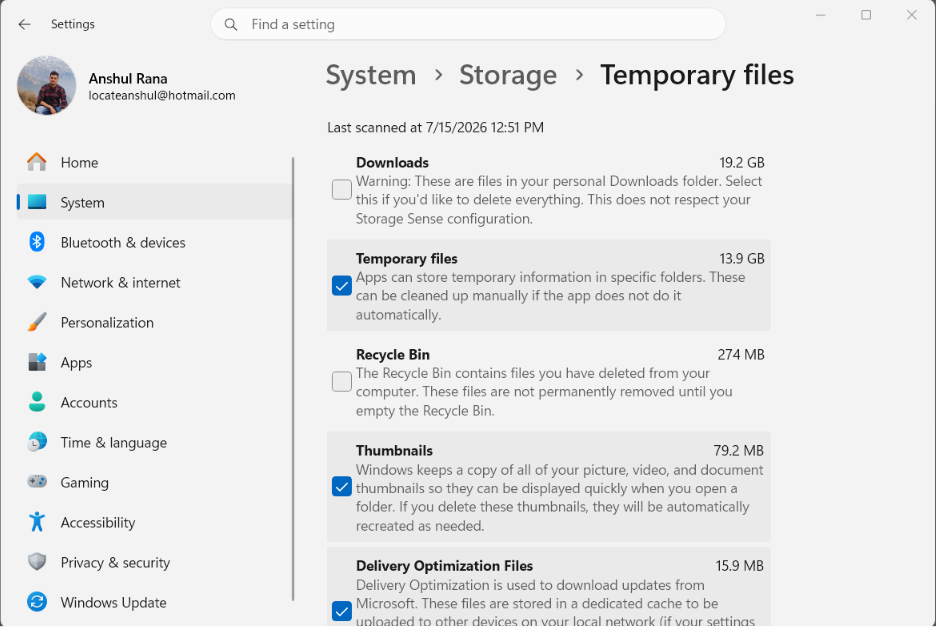
- Allow Windows to scan your drive. Review the list carefully. Select items such as:
- Temporary files
- Delivery Optimization files
- DirectX Shader Cache
- Windows Update Cleanup
- Recycle Bin (if you no longer need its contents)
- Click Remove files.
- Make sure you enable the Storage Sense feature as well.
3.2 Keep enough storage space
Windows requires free storage space for virtual memory, temporary files, Windows updates, application caches, and SSD wear leveling. So, when your drive becomes full, performance often declines because Windows has less room to manage these operations. A good rule is to keep at least 15 to 20% of the drive free. Especially in SSDs, it is required to have enough space for the controller to work effectively on all the tasks it has to perform.
Step 4: Memory Optimization
RAM, or Random Access Memory, is a computer’s short-term memory. Unlike storage, which holds the data permanently, RAM holds the temporary data that is required by the CPU to perform any task at hand. A slow RAM can heavily bottleneck the CPU and the incoming data to it. Lower RAM will also impact the performance in almost the same way. Although modern computers are great at handling all the memory resources, there are some important optimizations you can do to make sure your memory is working properly and in good health.
4.1 Enable XMP or EXPO Memory Profiles
When you install a new RAM, it doesn’t automatically operate at the highest speed as you see on its box. For compatibility reasons, most motherboards initially run the RAM at a conservative JEDEC standard speed. This is mostly lower than the module’s rate frequency.
For example, a DDR5-6000 memory kit may initially run at only 4800 MT/s until its performance profile is locked.
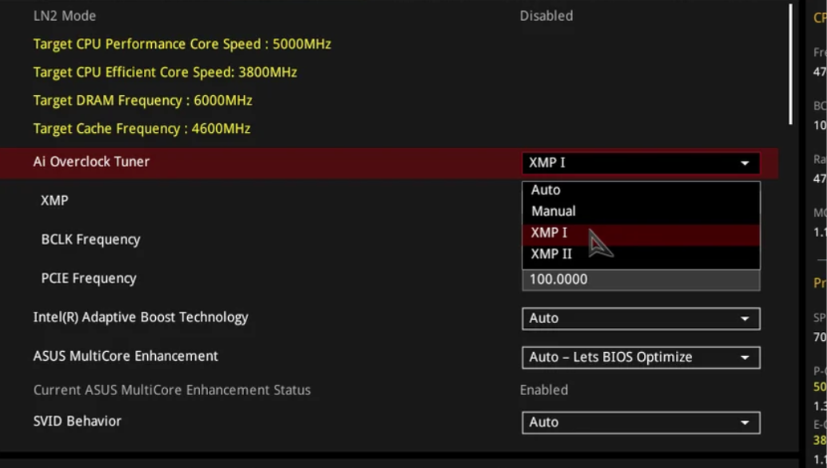
XMP (Extreme Memory Profile) is Intel’s technology for automatically applying the manufacturer’s tested memory settings, including frequency, timing, and voltage. EXPO (Extended Profiles for Overclocking) does the same job on AMD platforms. This is how you enable these memory profiles.
- Restart your computer and enter the BIOS/UEFI setup (usually by pressing Delete, F2, or another key shown during startup).
- Locate the memory or overclocking section. The exact location varies by motherboard manufacturer.
- Find the XMP (Intel) or EXPO (AMD) setting.
- Select Profile 1 (or the recommended profile if multiple are available).
- Save your changes and restart the computer.
4.2 Reduce Background Applications
Again, the apps running in the background consume some space in the memory, slowing down your system heavily if their number is higher. So, make sure only the necessary applications are installed and unwanted ones are either uninstalled or disabled.
Step 5: Windows Services Optimization
Windows services optimization is sort of a conservative process where the goal isn’t to disable as many services as possible but to aidentify services that you don’t use but are running. Keep in mind that Windows services are an important process of Windows, and messing with some important services or trying to stop them can cause serious, irreversible issues on your computer. Let’s see how you can use this feature properly.
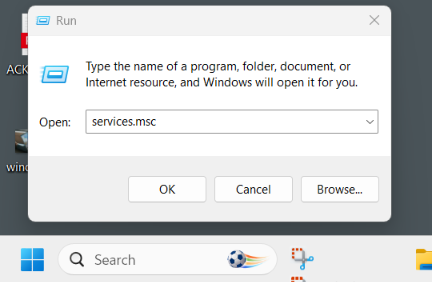
- Open the Run menu by pressing Windows + R.
2. Sort the services by Automatic.
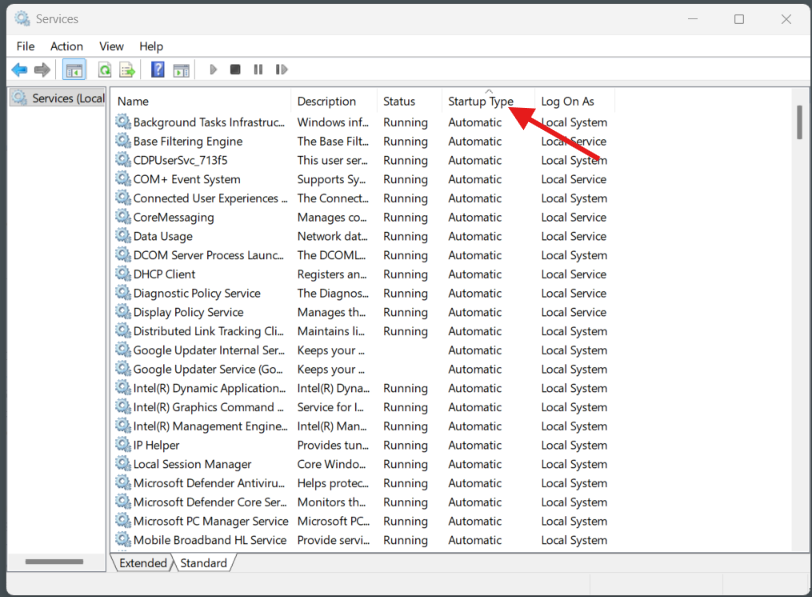
- Check Whether You Actually Use the Feature. Before changing any service, ask:
- Do I use this feature?
- Is another application dependent on it?
- Is it part of Windows security or networking?
If the answer is “No,” it’s a potential candidate.
- Double-click the service. For most optimizations:
- Prefer Manual because Windows can still start the service if needed.
- Use Disabled only when you’re certain you’ll never need it.
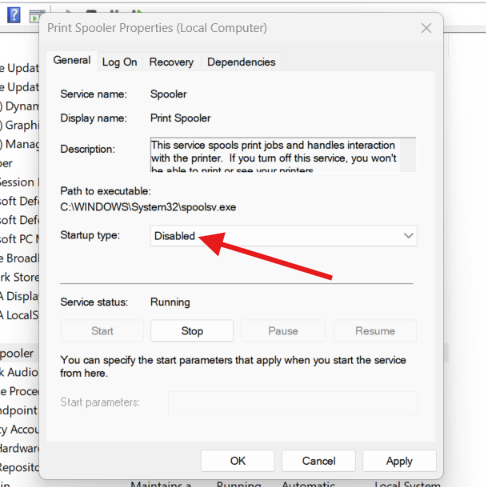
Services that you can safely stop for the purpose of service optimization.
| Service | Safe if… | Recommended Startup |
|---|---|---|
| Print Spooler | You never print | Manual or Disabled |
| Fax | Never use fax | Disabled |
| Bluetooth Support Service | No Bluetooth devices | Manual or Disabled |
| Downloaded Maps Manager | Never use offline maps | Disabled |
| Windows Insider Service | Not enrolled in Insider builds | Disabled |
| Retail Demo Service | Home PC | Disabled |
| Smart Card | Never use smart cards | Disabled |
| Smart Card Device Enumeration | Never use smart cards | Disabled |
| Geolocation Service | Don’t rely on location-aware apps | Manual |
| Touch Keyboard and Handwriting Panel | Desktop without touchscreen | Manual |
Step 6: Remove Windows 11 Bloatware Properly
In my opinion, on most medium- to high-end computers, Windows 11 bloat hardly puts any extra load in terms of performance resource usage. However, if your computer is slower or has limited resources, the extra load on your CPU, memory, and storage can surely reduce the performance a little bit. So, removing the bloat in this can really help you a lot.
The process of removing bloat manually is very simple. You just locate your program and uninstall it from the Windows startup menu.
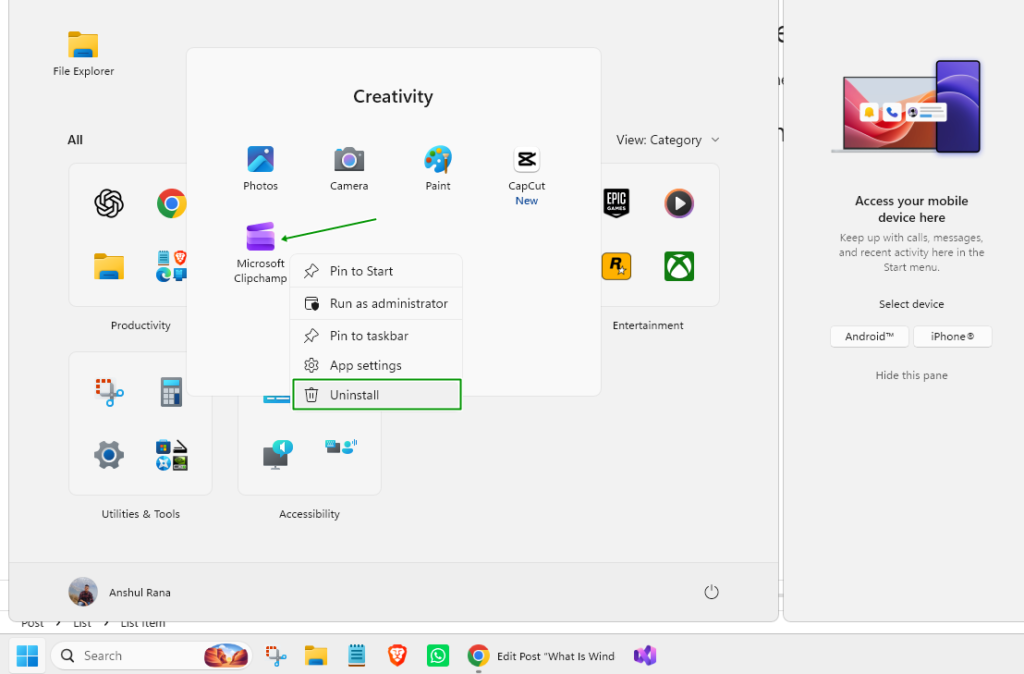
But you can also use software like HyperTweak to easily remove all the bloat with a single click. The process is as follows.
Use HyperTweak Debloater (Easy, Fast, and Free)
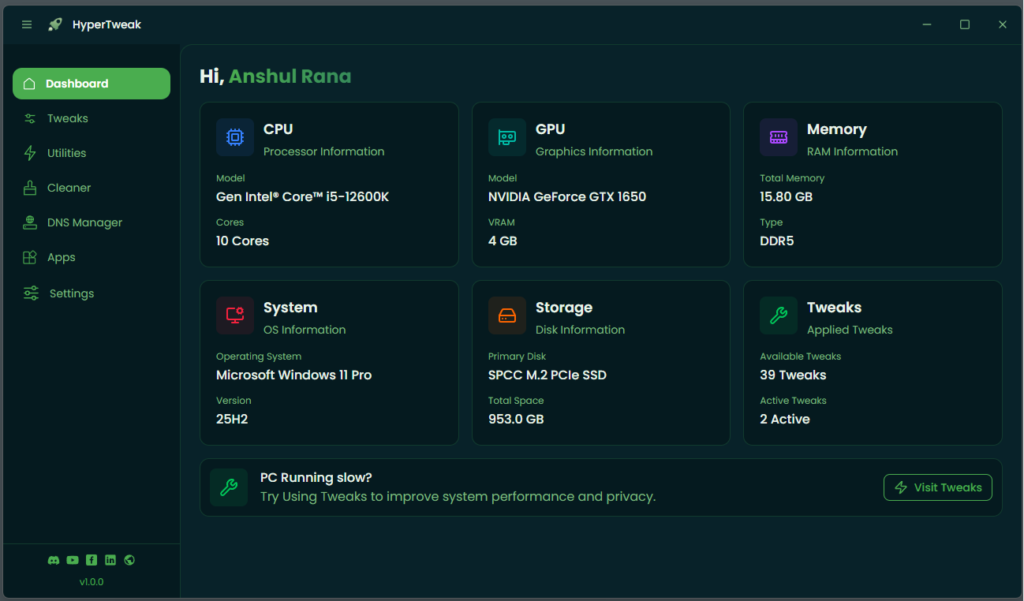
HyperTweak is a free Windows 11 Optimizer and Debloater. It removes all the bloatware in one click without causing any issues with your computer. Let’s see how you do it.
- Download HyperTweak from the official website.
- Install the program on your computer and open it
- Go to the Tweaks tab and click Apply in the Debloat Windows section.
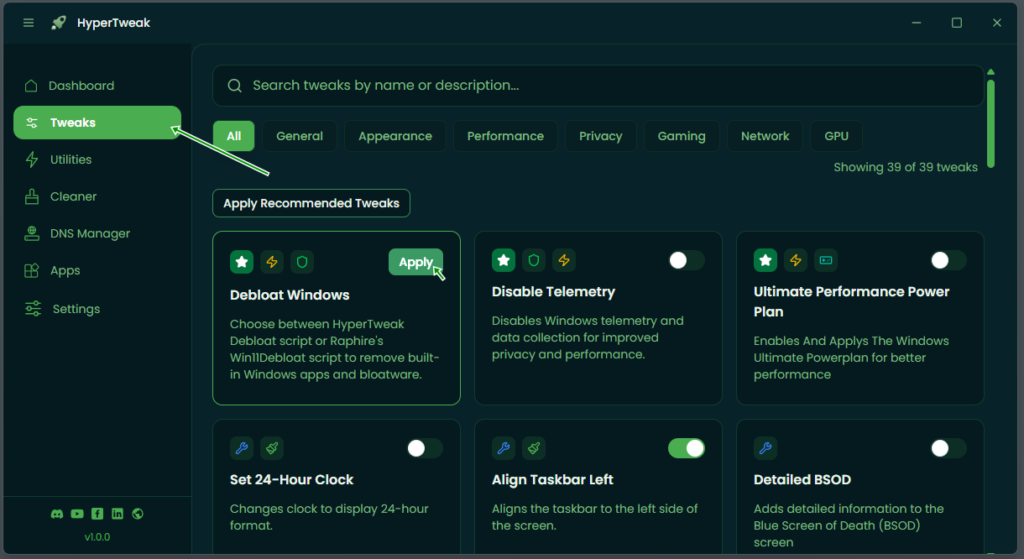
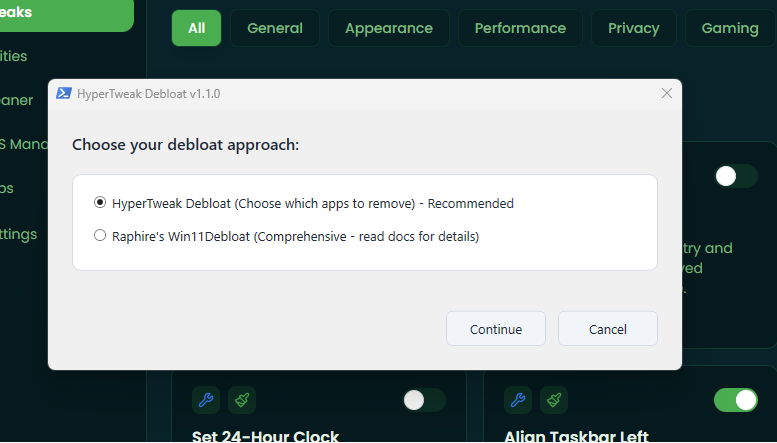
- Choose the HyperTweak Debloater Script and proceed for the debloating process.
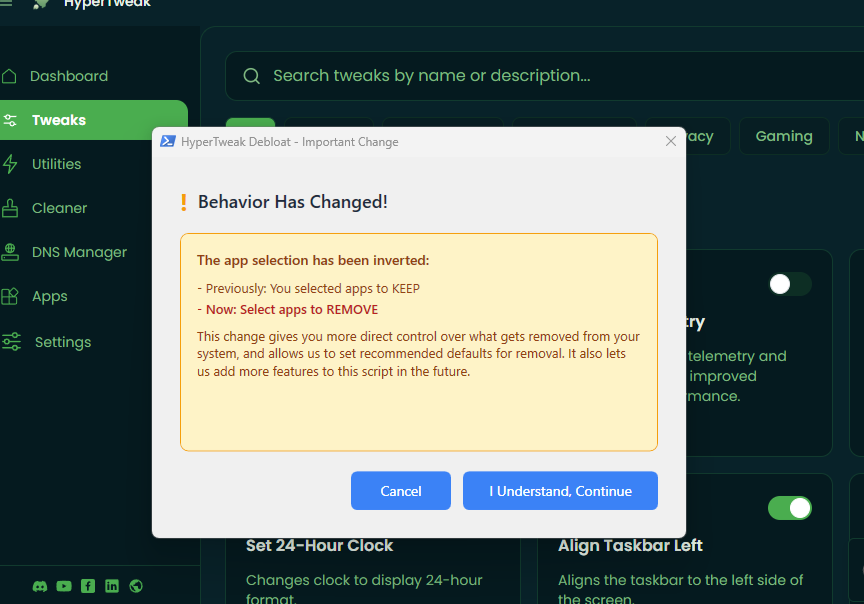
- Confirm the next pop-up.
- Choose the apps to remove and click Start Debloat.
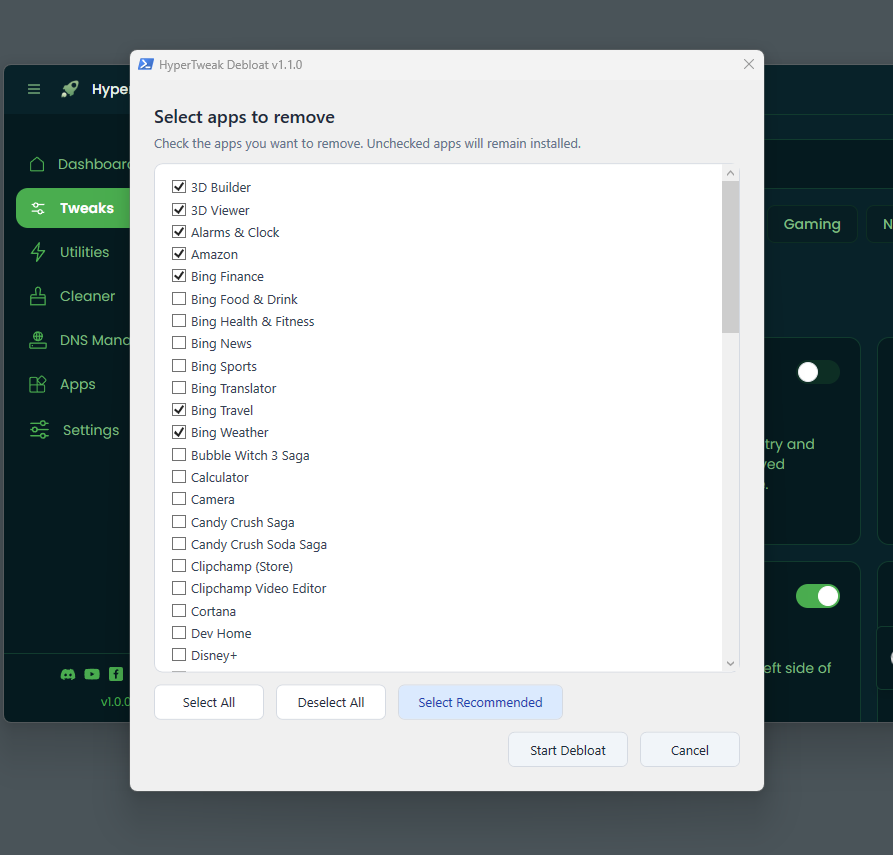
Wait for a minute or less, and all your selected apps will be removed from your computer.
Conclusion
Windows 11 has a very small room for performance optimizations. Microsoft has done a great job making Windows fast, beautiful, and smart in itself. But, still, you can perform these optimizations and make your computer a little faster because even a small gain can be beneficial sometimes.